
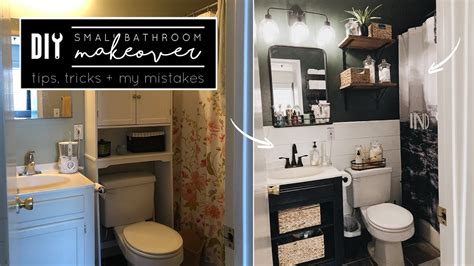
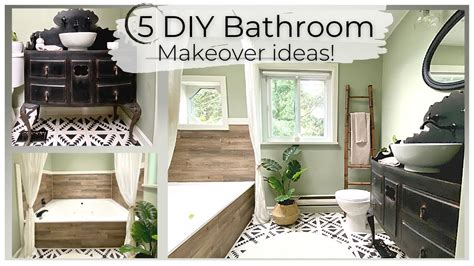
Transforming your bathroom with a DIY vanity can be a rewarding project that adds a personal touch to your space. Whether you’re looking to refresh an outdated look or create a unique, custom design, a DIY bathroom vanity offers endless possibilities. In this guide, we’ll explore creative ideas and step-by-step projects that will help you choose the right materials, plan your space, and bring your vision to life. From selecting tools to adding finishing touches, these DIY vanity ideas will inspire you to make your bathroom both functional and stylish, all while saving on renovation costs.
shzow.com offers a detailed exploration of this topic.
1. Introduction to DIY Bathroom Vanities
A DIY bathroom vanity is a fantastic way to personalize your space, blending both style and functionality in a piece that reflects your taste. Unlike store-bought options, creating your own vanity allows you to tailor every detail, from the materials and design to the size and finish, ensuring it perfectly complements your bathroom’s aesthetic. Whether you’re working with a small powder room or a spacious master bath, a DIY vanity project can be adapted to suit your needs.
This process is not only about aesthetics but also about maximizing space and creating a functional centerpiece for your bathroom. By taking on this project yourself, you can explore a variety of design options, from rustic and reclaimed wood vanities to sleek, modern pieces. Plus, it’s a cost-effective way to give your bathroom a fresh look without the expense of a full renovation.
In this section, we’ll delve into the basics of DIY bathroom vanities, discussing the benefits of building your own, the types of designs you can consider, and how this project can transform your bathroom into a more
2. Choosing the Right Materials
Selecting the right materials is a crucial step in creating a DIY bathroom vanity that is both durable and visually appealing. The materials you choose will not only define the overall look of your vanity but also determine its longevity, especially in a moisture-rich environment like a bathroom.
Wood is a popular choice, offering versatility in style from rustic to modern. Solid hardwoods such as oak, maple, or walnut are excellent for durability, while reclaimed wood can add character and a unique, vintage feel. If you’re aiming for a more contemporary look, consider using medium-density fiberboard (MDF) or plywood with a veneer finish. These materials are cost-effective and can be painted or stained to achieve your desired look.
For countertops, options like granite, marble, or quartz provide a luxurious and durable surface, while butcher block or concrete can add a rustic or industrial touch. Don’t forget to choose high-quality hardware, like handles and hinges, that complement your design. By carefully selecting materials that suit your style and needs, you’ll create a bathroom vanity that stands the test of time.

3. Space Planning and Design Considerations
Creating a DIY bathroom vanity requires careful space planning and design to ensure a perfect fit and a beautiful, functional outcome. Start by measuring your bathroom thoroughly to determine the optimal size for your vanity. Consider the position of your plumbing fixtures, as this will impact the design and placement of the vanity itself.
For small bathrooms, a compact design is best to avoid overcrowding. Wall-mounted vanities offer an airy feel by maximizing floor space. Corner vanities utilize often neglected areas efficiently. Larger bathrooms benefit from a double vanity, providing ample storage and convenience, especially in shared spaces.
Your bathroom vanity should seamlessly integrate with the existing aesthetic. Whether you favor a modern, minimalist vibe or a classic, traditional style, the vanity should harmonize with elements like the flooring, tiles, and lighting. Furthermore, consider practical features such as drawers, shelves, or open storage to ensure your bathroom essentials are neatly organized and readily available.
Last but not least, consider the intended use of the vanity. A thoughtfully designed vanity that strikes a balance between aesthetics, functionality, and space optimization will not only enhance your bathroom’s practicality but also elevate its overall appeal, making it a truly remarkable focal point in your home.
4. Tools and Equipment Needed
To successfully build a DIY bathroom vanity, having the right tools and equipment is essential. The specific tools you’ll need may vary depending on your design and materials, but a few key items are generally required for most projects.
Start with basic carpentry tools, such as a tape measure, level, and square, to ensure accurate measurements and straight lines. A circular saw or table saw will be necessary for cutting wood or other materials to the correct dimensions. A jigsaw can help with more intricate cuts, such as creating openings for plumbing.
For assembly, a power drill with a variety of drill bits and screwdriver attachments is indispensable for driving screws and securing components. Wood glue and clamps will help hold pieces together during assembly, ensuring a strong bond. Sanding tools, such as a power sander or sanding block, are also important for smoothing surfaces and edges.
If your design includes a countertop made from materials like stone or concrete, you may need specialized tools such as a wet saw or grinder. Finally, finishing tools like paintbrushes, rollers, and a paint sprayer will be necessary to apply the final coat of paint, stain, or sealant, giving your vanity a polished, professional look.
5. Step-by-Step DIY Vanity Projects
Creating a DIY bathroom vanity can be an enjoyable and fulfilling project. Here’s a step-by-step guide to help you bring your vision to life.
Step 1: Design and Plan
Start by sketching your vanity design, considering your bathroom’s size and style. Decide on the number of drawers, shelves, and any special features like a built-in sink or custom countertop. Make a detailed list of materials and tools needed for the project.
Step 2: Gather Materials and Tools
Once your design is finalized, gather all the materials and tools required. Ensure you have everything on hand before starting to avoid interruptions during the construction process.
Step 3: Cut and Assemble the Frame
Measure and cut the wood for the vanity frame according to your design. Use a level and square to ensure the frame is straight and sturdy. Assemble the frame using wood glue and screws, clamping pieces together as needed.
Step 4: Add Shelves, Drawers, and Panels
Cut and install shelves and drawer components, ensuring they fit snugly within the frame. Attach side panels and any additional features like a backsplash.
Step 5: Sand and Finish
Sand all surfaces to remove rough edges and prepare them for finishing. Apply your chosen paint, stain, or sealant, allowing it to dry between coats for a smooth, professional finish.
Step 6: Install Countertop and Fixtures
Finally, install the countertop, sink, and any hardware like handles or faucets. Once everything is securely in place, your new vanity is ready to enhance your bathroom’s style and functionality.
6. Creative and Functional Storage Solutions
To keep your DIY bathroom vanity organized and clutter-free, maximizing storage is crucial. By incorporating creative and functional storage solutions, you can transform your vanity into a stylish and practical centerpiece.
Begin by designing drawers that can hold a variety of bathroom necessities. Deep drawers are perfect for storing larger items such as towels or hairdryers, while shallow drawers are ideal for cosmetics and smaller toiletries. To ensure items are neatly organized, consider adding dividers inside the drawers.
Open shelving offers another versatile storage solution, providing easy access to frequently used items such as soap, lotions, or decorative accents. You can also add pull-out trays or baskets for additional storage, simplifying the retrieval of items stored at the back of the shelf.
For a truly innovative approach, consider hidden storage compartments. These can be built into the vanity’s design, offering a discreet space for personal items or cleaning supplies. By thoughtfully incorporating these storage solutions into your DIY vanity, you’ll create a bathroom that’s not only beautiful but also functional.
7. Tips for Finishing Touches and Maintenance
To keep your DIY bathroom vanity looking its best and functioning properly, take the time to add finishing touches and maintain it. Begin by inspecting your work for any rough edges or imperfections, sanding them down as needed to achieve a smooth surface. Then, apply a final coat of paint, stain, or sealant to protect the vanity and enhance its appearance.
Install hardware, including handles, knobs, and hinges, ensuring proper alignment and secure attachment. These seemingly small details can greatly influence the overall aesthetic of your vanity. Consider incorporating a backsplash or decorative trim to finalize the design and achieve a polished look.
To keep your vanity in top condition, clean it regularly with mild, non-abrasive cleaners. This will help prevent damage and preserve its finish. Inspect the vanity for any signs of wear or damage, such as loose screws or peeling paint, and address these issues immediately. Proper maintenance will ensure your vanity lasts for years to come and keeps your bathroom looking fresh and stylish.
Transforming your bathroom with a DIY vanity is a rewarding project that combines creativity and practicality. By choosing the right materials, planning yo
shzow.com